
If you recently purchased a new recreational vehicle (RV), there’s a good chance it came with a battery disconnect switch installed. However, if not, you can easily add one and benefit from the added protection and security they offer. RVs come with their set of unique challenges, one of which revolves around its battery. An RV battery disconnect switch, a must-have for every RV owner, provides a break between the Battery and RV appliances and equipment that runs off it.
In newer RVs, check the area around the battery or near the control panel to see if you have one installed. You may also want to check inside the storage compartments closest to the battery to see if it’s located there. If not, installing a new switch is really easy. Below, we’ll take a closer look at a battery disconnect switch, how the switch works, how to install it, and its benefits. We’ll also review the best battery disconnect switches you can purchase today.
What is an RV Battery Disconnect Switch?
At its most basic, an RV battery disconnect switch is a simple device that allows you to completely disconnect the main battery from the RV’s electrical system. This means that no electrical devices inside the RV can draw power from the battery when the manual switch is turned off. It’s just like a light switch for your RV battery. Once connected, you can easily flip the switch and know there’s no 12-volt electricity between your battery and RV.

A disconnect switch is relatively inexpensive and should be installed on all RVs. If you don’t have one, the other way to disconnect the battery is to remove the 12-volt negative battery cable from the battery terminal. While this accomplishes the same thing, the most convenient way for RV owners to disconnect the power supply from the battery is to install a disconnect switch. The switch will work with most RV setups, and it doesn’t matter the type of battery you have. If you don’t use a switch, you should keep your RV connected to a battery tender when not in use.
Best Battery Disconnect Switches (read more below)
|
Best Overall
|
Switch with Key

|
Best for Multiple Battery Systems

|
|
3.5
|
3.5
|
3.5
|
|
|
N/A
|
$15.99
|
Why Install a Battery Disconnect Switch?
Battery Health:
Over time, appliances and devices inside the RV can draw power from the battery, even when they seem off. This is often referred to as ‘phantom’ or ‘parasitic’ loads. By disconnecting the battery, you prevent these small drains, thereby extending the battery life. This is often the main reason many people install one.
Even if you have all your 12-volt appliances turned off, there’s a good chance that something is still drawing electrical power. Even the small light on your propane or smoke detector will deplete a changed battery over time. Simply flipping the switch on a battery disconnect can make you confident that all battery voltage flow is cut off.
Safety:
Disconnecting the battery is crucial in case of electrical issues or when working on the RV’s electrical system. With a switch, this becomes a hassle-free task. You don’t need to fiddle with removing wires from the battery posts, which can create a separate set of safety issues if not done correctly.
An RV disconnect switch is the best way to isolate the 12-volt electricity and ensure it’s not flowing through your RV when working on 12-volt appliances or installing a new one. Aside from being able to disconnect the battery in case of an emergency, it’s also an excellent tool for diagnosing things like short circuits or appliances that aren’t working correctly.
Storage:
When storing your RV for long periods of time, it’s a good idea to disconnect the battery to ensure it doesn’t get drained. A switch makes this process quick and straightforward. It’s wise to flip the disconnect switch whenever you’re not using your RV to prevent battery drain.
This is important not only for the health of your battery but to ensure you have power for your RV when getting ready for a trip. For example, you may have a power tongue jack for your travel trailer, and if you have a dead battery, it won’t work. The same goes for slides, awnings, and even your trailer lights. I suggest flipping your battery disconnect switch whenever you place it in storage between trips or for a long time.
How to Install a Battery Disconnect Switch:
Installing a battery disconnect switch in your RV is easy and something any DIY RVer can tackle. If you’re comfortable cutting and splicing wires, you can tackle this job yourself. If you’ve ever installed an outlet or light switch at home, you have most of the skills you need for this task.
However, if you don’t feel comfortable doing the work, it’s a quick task that any RV technician or mechanic can do. Just call a few places for a quote and choose a repeatable business. It should take them less than an hour to complete the job.
STEP 1: Choose the Right Switch
Many switches are available on the market, so pick one that fits your RV’s specifications. Typically, they come in two types: knife-blade and rotary. Both will accomplish the same task, so the style is really a personal preference. Also, the location of the switch may be a factor in what style will work best for your RV.
I like the rotary switch style since it’s lower profile and less prone to accidental switching. I also suggest one that is clearly marked with an on/off label or green and red color so you can quickly determine if the battery is disconnected.
STEP 2: Disconnect the Battery
Before any installation, safety comes first. Turn off the RV and disconnect the negative battery terminal. Once the cable is removed, tuck it out of the way, or better yet, tape it to the side of the battery so it can’t accidentally make contact with the terminal while you’re working on it.
STEP 3: Find a Suitable Location
The switch should be easily accessible. A typical location is near the battery compartment or the RV’s entrance. They can also be placed on the battery box or the trailer tongue. In short, the best location to mount it is close to the battery and conveniently located where you can easily access it when needed. Many people, including RV manufacturers, will locate these inside the storage compartment closest to the battery.
On a travel trailer, this is usually in the front of the trailer by the tongue jack. The battery is usually mounted on the frame in a weatherproof battery box. The battery may be located in a utility storage area in motorhomes and fifth wheels.
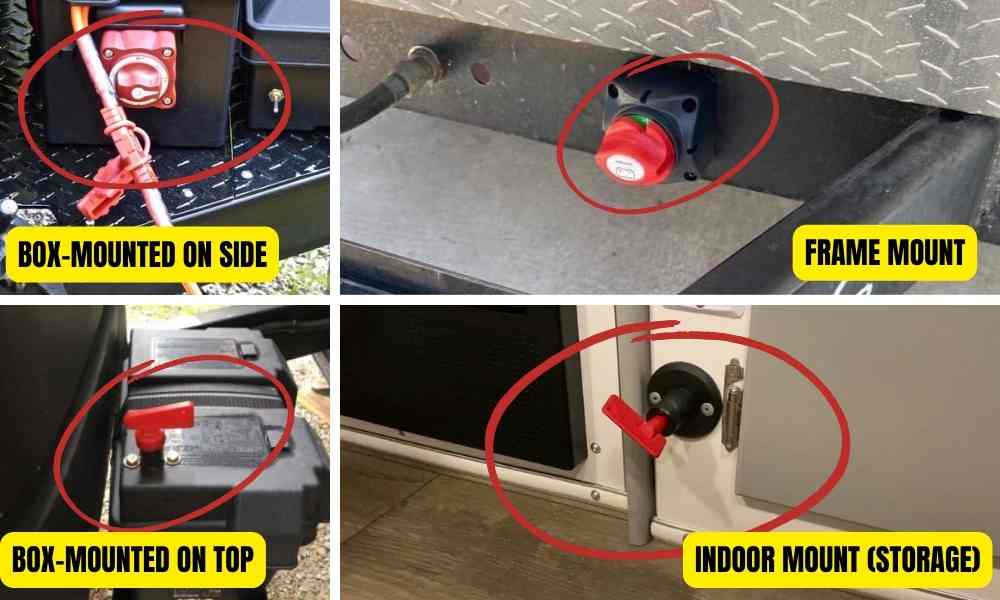
If mounting it inside the RV or a storage compartment, you may need to drill a small hole to run the wiring to the mounting location. If you do this, ensure you seal the hole around the wire to prevent water or moisture from getting in.
If mounting outside on the battery box, it will be accessible to anyone walking past your RV. While not a big concern, realize that anyone can flip the switch and cut off your 12-V power. I like the security of mounting it inside the RV or a storage compartment to prevent this. If you mount it outside and are worried about someone tampering with it, you can choose to purchase one with removable keys.
STEP 4: Connecting the Wires
The next step is to trace the wires that run from your battery to the RV. Your goal will be to locate the disconnect switch between the battery and the connection to the RV 12-V systems. Some installations will make this connection right at the battery on the negative battery top post. Others will intercept the wire further down the line, closer to the mounting location of the switch.
Most battery disconnect switches will intercept the negative cable, breaking the connection between the negative lead (black wire) and the battery. It can also be installed on the positive lead, but the best practice is to install it on the negative side.
Each battery switch will have instructions that will guide the installation process. However, most will have just two terminals, one for the cable from the battery and another for the cable to the RV.
STEP 5: Reconnect battery
Once the switch is installed, reconnect the RV battery. If both cables are removed, install the positive wire first and then the ground. This is the same process you would follow for a car battery.
STEP 6: Test the Setup
Test the Setup: Once everything is connected, turn the switch on and check your RV 12-V electrical appliances or lights. Everything should work as usual. All the electrical systems should go off when you turn the switch off. If everything is working correctly, then you’re all done.
STEP 7: Secure and Label
Ensure the switch is securely mounted. It might also be helpful to label it so that others know its function or to help you more quickly identify when the switch is turned on or off.
Protecting Your RV from Short Circuits with a Battery Disconnect Switch
What is a Short Circuit?
Short circuits can be the nemesis of any electrical system, including that of an RV. They occur when electricity travels along an unintended path, offering little to no resistance. In an RV, this can sometimes be created when the movement of an RV rubs that protective sheathing of the wire and causes it to contact the frame’s metal.
A short circuit happens when a breach in the usual electrical circuit allows electricity to flow through an unintended, ‘shorter’ pathway. In RVs, common causes include frayed wires, damaged receptacles, or a faulty connection to an appliance. This can lead to sudden surges of electrical current, potentially causing damage, battery drain, or even electrical fires.
How Does a Battery Disconnect Switch Help?
Immediate Isolation: The switch lets you quickly disconnect the battery, instantly cutting off the power source, which is essential during a short circuit or when one is suspected.
Routine Maintenance Tasks: Before performing any electrical maintenance or troubleshooting in your RV, it’s crucial to disconnect the battery to prevent accidental short circuits. The switch makes this process quick and safe.
Battery Disconnect Switch Position While Towing?
Your battery switch should only be turned off when storing your RV or performing maintenance when you need to stop the power flow from the battery. When towing or driving your RV, battery power is a critical component that you need, especially when towing. It’s responsible for trailer lights, electric brakes, and safety features inside your RV, like propane detectors and alarms. So, when towing your RV, always keep the switch in the on position, keeping power flowing to your RV. If not, your RV won’t get power from the tow vehicle or battery.
Use with solar panels or battery banks.
RVs with solar panels or relying on a larger RV battery bank will want a battery disconnect switch installed. Regardless of the battery’s size, disconnecting it when not using it is still important. However, you also need to think about charging.
If your battery disconnect switch is in the off position, meaning that power is cut from the battery, your solar panels may not be able to charge the RV batteries. So, in this case, don’t engage the switch when you need to charge via solar. When your house batteries are fully charged and ready to be set for storage, you can then engage the disconnect.
However, remember that solar panels and larger battery banks may have unique setups. Some may have switches to turn off charging, allow charging but not use, or a combination of the two. Others may have special conditions that require a higher amperage switch, depending on the size of your panels.
When installing a switch for a solar setup, please always check your current system to ensure you’re installing the suitable switches in the best configuration for your needs.
Battery disconnect switch when connected to Shore Power
RVs are a complex system, with some appliances and electrical equipment relying on shore power and others just on 12V power. For this reason, you shouldn’t engage a battery disconnect switch when using your RV on shore power.
If you were to disconnect the battery, in addition to the battery not charging, many of your 12-volt appliances or lights wouldn’t work. Only use the switch when you need to perform maintenance or when the RV is stored and not in use.
Best Battery Disconnect Switches for your RV
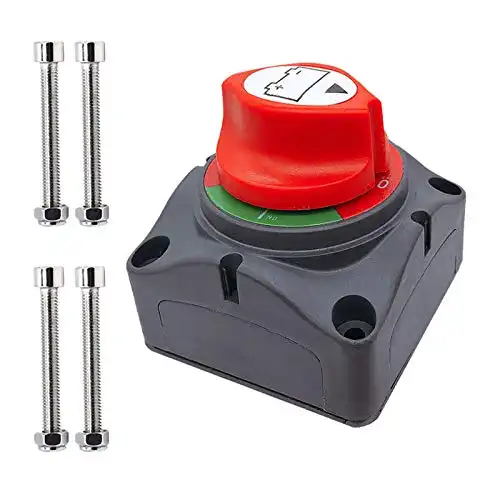
The Ampper 12-48V Battery Power Switch is a simple and well-designed disconnect switch that's perfect for standard RV use. It's designed to cater to DC 12-48V systems and can easily mount in a variety of indoor or outdoor locations. It features a straightforward On/Off 2-position operation and gives you complete control over your battery electrical connection.
Effortless Control, Reliable Performance: One of the key reasons I recommend this switch is its simplicity. With just two positions – On and Off – it's incredibly easy to operate. This means you can effortlessly manage your RV's power system, ensuring that there's no unnecessary battery drain during periods of inactivity.
Seamless Installation: For those who aren't DIY experts, fear not. The Ampper Battery Switch is very easy to install. You don't need to be a RV tech or mechanic to get it up and running.
Durability: Quality matters to me, especially when it comes to my RV accessories. The Ampper switch is constructed out of heavy-duty ABS plastic housing ensures it can withstand the challenges of RV life. Plus, the rear cover provides an extra layer of safety by preventing short circuits.
Power Handling: Whether you're dealing with heavy loads or sudden power demands, this switch will be more than adequate. Its copper terminals are designed for heavy-duty performance. With the ability to handle continuous currents of 275A, intermittent currents of 455A, and momentary currents of 1250A at DC 12V, you can trust this switch to deliver power when you need it most. For almost all RV setups, this will be above and beyond what you need.
- ABS plastic housing for durability and safety.
- On/Off 2 positions for easy operation.
- Copper terminal stud with nuts and washers for heavy-duty performance.
- 4 mounting screw holes for secure installation.
- Current ratings: 275A continuous, 455A intermittent, and 1250A momentary at DC 12V.
- Suitable for DC 12-48V systems for versatile application.
- Standalone use or lockable with other switches for enhanced customization.
- Safely eliminates power draw from the battery during periods of inactivity.
- Universal compatibility with Car, Vehicle, RV, and Boat applications.
- Size: 2.68" x 2.68" x 3.07" for a compact yet impactful presence.
The Jtron Battery Switch Disconnect is a great key-style switch with excellent reviews and solid construction.
Enhanced Security: The Jtron Battery Disconnect Isolator Master Switch comes with two removable keys that provide unparalleled control over your RV's power. This switch offers the flexibility and reliability you need for RV use. What sets it apart is its design – the key can be removed when there's no power connection, preventing any accidental switching and ensuring a safe power supply.
Weather-Ready Protection: The waterproof case adds an extra layer of security, protecting the keyhole from the elements.
Safeguard Your Investment: When your RV is in storage, the last thing you want to worry about is battery drain. This cutoff switch is easy to engage, providing peace of mind knowing that the battery is disconnected. Removing the key ensures nobody can turn it back on.
Good Performance: The switch will handle regular RV without issues. It has a continuous rating of 200 Amps and an intermittent rating of 300 Amps at 12V-24VDC. It even handles cranking tasks with a rating of 1000 Amps for 5 seconds. The low contact resistance of 50m ohms ensures efficient power flow, and the insulation resistance adds an extra layer of safety.
User-Friendly Installation: The convenient mounting option allows for easy installation at the battery box or inside the RV. The housing is weather-resistant, and the low profile ensures a clean setup.
- Continuous Rating: 200 Amps 12V-24VDC Max.
- Intermittent Rating: 300 Amps
- Cranking Rating: 1000 Amps 5 sec.
- Contact Resistance: 50m ohm Max
- Insulation Resistance: DC 500V 100M ohm Min
- Dielectric Strength: AC 1000V 1 minute, DC 2000V 1 minute
- Operation Temperature: -30℃ ~+60℃
- Switch Function: 2P SPST OFF-ON
Best Battery Disconnect Switch for multiple battery banks
If you need a switch for a more complex setup with two battery systems, I recommend the Ampper 1-2-Both-Off switch. This allows you to have one battery bank on while the other is disconnected. This is more common in setups with a solar battery bank for the main house battery and a separate one for the vehicle or towing components.
- Designed for 2 batteries, switchable separately or together.
- Durable ABS plastic housing for safety.
- Rear cover prevents short circuits.
- 4 positions: 1-2-Both-Off.
- Copper terminal studs with nuts and washers.
- 4 screw holes for mounting.
- Handles 200A continuous, 300A intermittent, 1000A momentary at DC 12V.
- Isolates and secures DC 12-48V electrical systems.
- Can be standalone or locked with other switches.
- Stops battery drain when vehicle or boat isn't in use.
- Safely disconnects the battery.
- Universal for Car, Vehicle, RV, and Boat.
- Works as an equipment switch.
- Compact size: 2.68" x 2.68" x 3.07".
Additional Installation Supplies

|

|

|
|
3.5
|
3.5
|
3.5
|
|
|
$62.98
|
$40.99
|
In Summary
An RV battery disconnect switch is a small investment in cost and effort, but its benefits in terms of battery life, safety, and convenience are enormous. If your RV doesn’t already have one, consider installing it soon – it’s a decision you’re unlikely to regret