If you own or have ever camped in a travel trailer, you know that they can sometimes be a little bouncy if not properly stabilized. However, this can easily be fixed with a few best practices for stabilizing it when you’re at the campsite.
While all RVs can benefit from stabilization, travel trailers are typically more prone to movement when camping because they are lighter, can be long, and usually have axles close to the vehicle’s center. Reducing this movement requires you to balance the RV properly, ensure firm footings of the stabilizing jacks, and reduce tire movement or bounce. Luckily, some great techniques and products are on the market to help make this relatively easy to remedy.
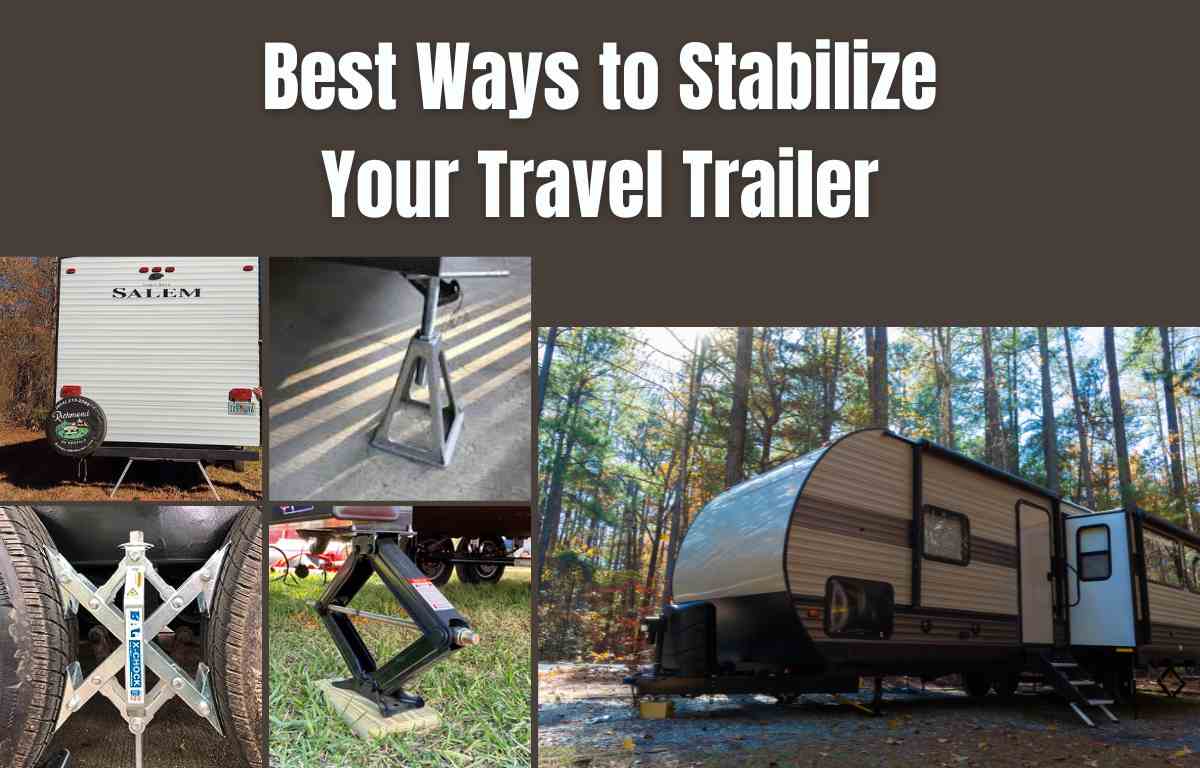
Properly stabilizing your travel trailer is essential for a smooth and enjoyable stay at the campground, preventing unnecessary swaying, rocking, and discomfort during your trips. If not adequately stabilized, being inside your travel trailer may feel like you’re on a boat. This comprehensive guide will explore the best way to stabilize your travel trailer using the right tools and equipment, including various travel trailer stabilizers, jacks, chocks, and leveling systems. We’ll cover some of the different types of RV stabilizers and their advantages.
Below, we’ll cover everything you need to know about stabilizing your RV. However, if you need some quick tips for stabilizing your travel trailer, here are some of the key things to consider:
Travel Trailer Stabilizing Basics
- Understand the Need for Stabilization: Recognize that travel trailers are more prone to movement due to factors like lighter weight and central axle positioning.
- Leveling the RV: Begin by leveling your RV to enhance stability and reduce movement. Select a level campsite for easier setup and minimize the extension of jacks.
- Frame/Bumper Stabilizer: Use a rear bumper stabilizer to address the bounciness at the RV’s rear, often less supported than the front.
- Use Moveable Jack Stands: Implement portable jack stands to create a solid base between the trailer frame and the ground, adaptable to various locations under the RV.
- Avoid Slide Stabilizers: Be cautious with slide stabilizers for trailers with slide-outs, as they can misalign the slide-out mechanism.
- Permanent Stabilization for Full-Time RVers: If you’re staying long-term at a site, consider a more permanent stabilization solution integrated with the RV’s frame.
- Right Tools for the Job: Equip yourself with jack pads and a bubble level for effective stabilization and accurate leveling.
- DIY Stabilizing Solutions: Use lumber scraps or concrete blocks for a cost-effective stabilization method on uneven surfaces.
- Advice for First-Time RVers: New to RVing? Start simple, seek advice from experienced RV owners, and learn proper stabilization techniques gradually.
- Choosing Quality Equipment: Invest in high-quality stabilizers, jacks, chocks, and leveling systems that match your trailer’s weight and type.
The Importance of Stabilizing Your Travel Trailer:
Stabilization is the cornerstone of a relaxing RV experience. Whether you own a fifth wheel or a traditional travel trailer, maintaining stability is crucial for safety and comfort. A well-stabilized trailer minimizes the risk of accidents, keeps your belongings secure, and provides a level surface for all your activities.
Unlike a motorhome, which has axels in the front and rear of the vehicle, many travel trailers will have just two axels, or even just one, located close to the center of the trailer. When you walk or move on either end of the trailer, it will naturally want to sway or rock.
This is minimized by lowering your stabilizing jacks, but this alone won’t remove all movement. You will need to take a few extra steps to stabilize your RV further. These additional steps are not a requirement for safety, but they can significantly improve the comfort of living in the RV.
You may also want to check out this good article on the LevelMate Pro RV leveling system.
Leveling your RV
The leveling process is the first step to stabilizing your travel trailer. A properly level RV will be more stable and less prone to movement. When selecting your campsite and position for your trailer, choose the most level site available. By reducing the amount of leveling you need with blocks or ramps, you will also reduce the amount of movement you introduce into the setup.
The more you need to extend your jacks to reach the ground, the more rocking and sway you’ll end up with in your trailer. Try to pick a fairly flat location to start with, and then adjust your level as needed.
Essential Stabilizing Equipment:
Have you ever been to a restaurant where one table leg was a little short than the others? Even a slight difference can make for an annoying meal. In a travel trailer, you have seven primary contact points that stabilize the RV on the ground: The tires, four corner stabilizing jacks (landing gear), and the front tongue jack. If one of these is not firmly against the ground, you’ll experience increased movement.
Tires:
One of the first things you’ll need to do when you get back or pull into your campsite is to level it. This is accomplished by raising one side of the RV with blocks or ramps. My personal choice for leveling is to use the Andersen Leveling System. The Andersen levelers are a curved piece of last you drive onto the achieve the perfect level.
The contact point of the tires, whether on the ground or raised by blocks or ramps, provides your RV’s first contact point.
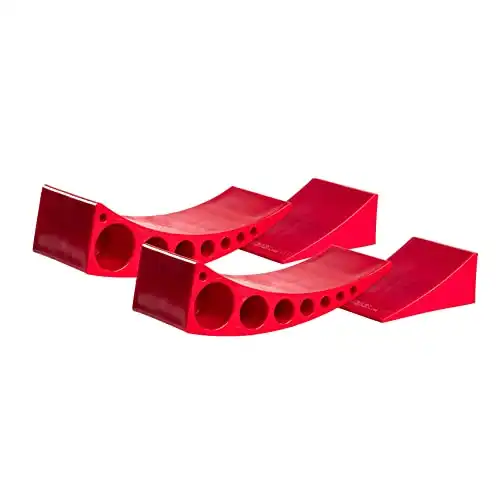
The Andersen Camper Leveler system is a simple, low-tech solution to fine-tuning your RV leveling. The system involves two components: A curved riser and a wheel chock. To use, you simply place the curved leveling pieces under the tires of the side that you need to raise up and back/drive onto it. Once level, you just insert the wheel chock behind the opposite side of the level, and you’re done.
This system makes it extremely efficient to level your RV, especially when combined with a wireless level reader like the LevelMatePro.
Pros
- Simple and low-tech design
- Sturdy and almost indestructible- solid as a rock
- One person leveling made simple
- Made in the USA
Cons
- More expensive than plastic blocks
- Limited height (only lifts up to 4”)
Tongue Jack:
The next step in leveling is to raise or lower the tongue jack. This will provide the front-to-back level adjustment. The tongue jack comprises a long tubular pole that extends or retracts to get the proper height. However, the more you extend it, the more movement you’ll introduce to the RV. In general, it’s better to place leveling blocks or large pieces of wood under the jack arm rather than extend it all the way. This will help to start with a more stable setup. A tongue jack may be a power jack or a hand crank.
Stabilizing Jacks:
Most RVs will have four stabilizing jacks, one at each corner of the RV. Depending on the type of travel trailer you have, these jacks will be operated manually or with a push of a button. Some travel trailers will also have auto-leveling jacks, adjusting accordingly to level the RV. These hydraulic jacks are very convenient for getting set up with just the push of a button.
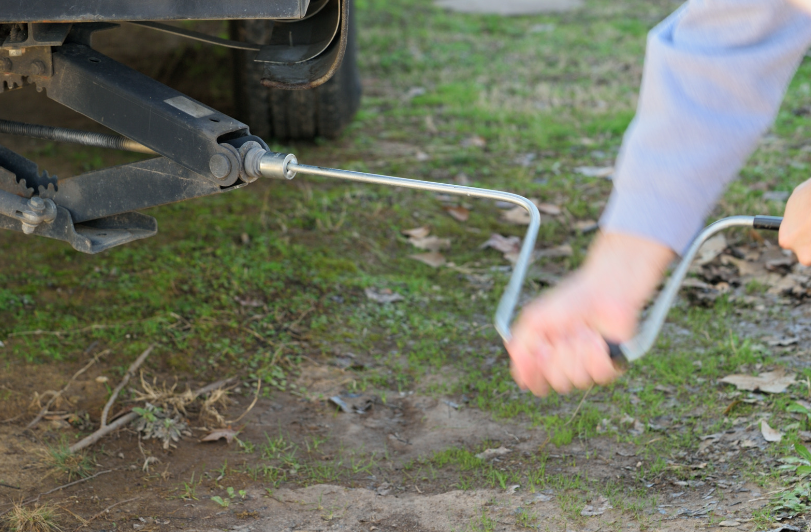
If your trailer doesn’t have an auto-leveling system, do not attempt to lift your RV with the trailer jacks. They will only be for stabilizing the trailer. Like the tongue jack, if the stabilizing jacks are fully extended, you will introduce more movement into the system. Placing blocks under the jacks is better than extending them fully. Both power jacks and scissor jacks accomplish the same task.
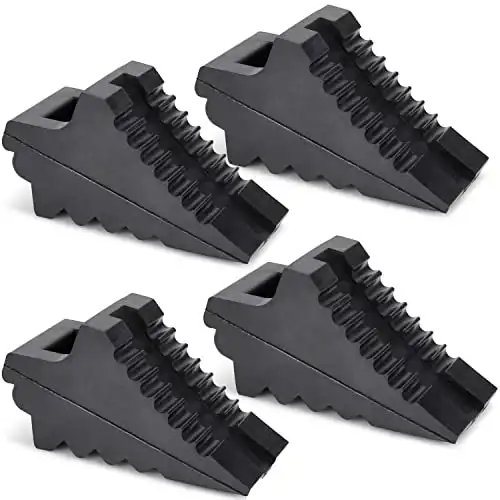
Wheel Chocks:
An essential part of RV safety is to chock your wheels. This should be the first thing you do once you get your RV moved into position and leveled from side to side. Not doing this creates the risk of your RV rolling, which can cause serious injury and damage to your RV.
Traditional wheel chocks are wedge-type items that are placed under at least two of the tires. They should be installed on the side of the tire, most likely to roll. In some instances, this is obvious. I typically install chocks in both directions on flat surfaces to prevent any potential movement.
Wheel chocks will also assist with RV trailer stabilization. While it may seem minimal, even a slight shift of the tires can make the RV feel like a boat. Properly chocking your tires can help with this.
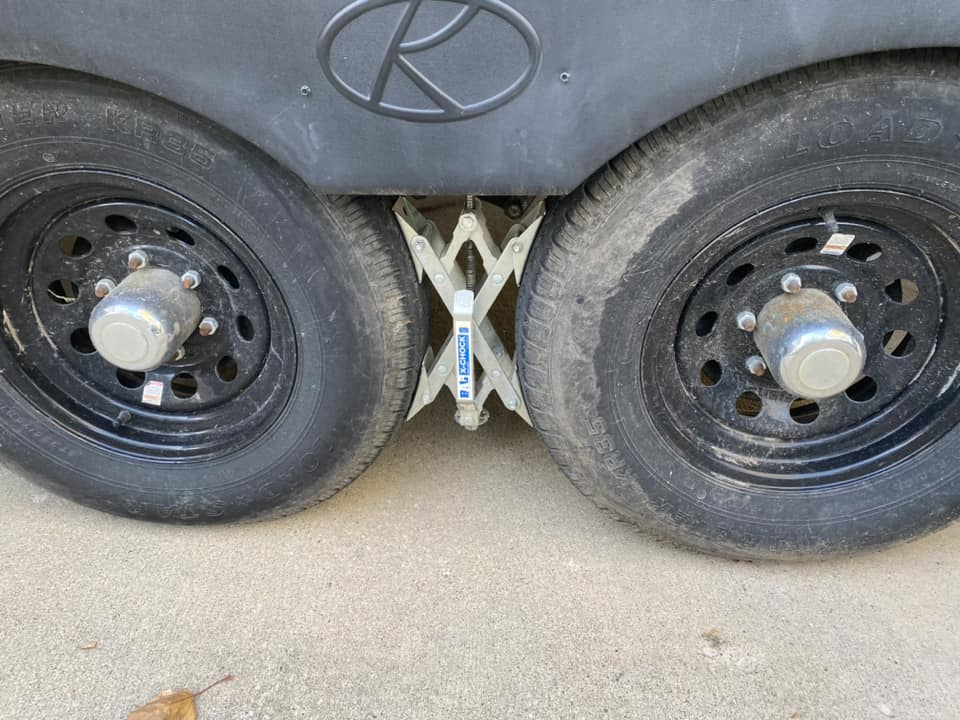
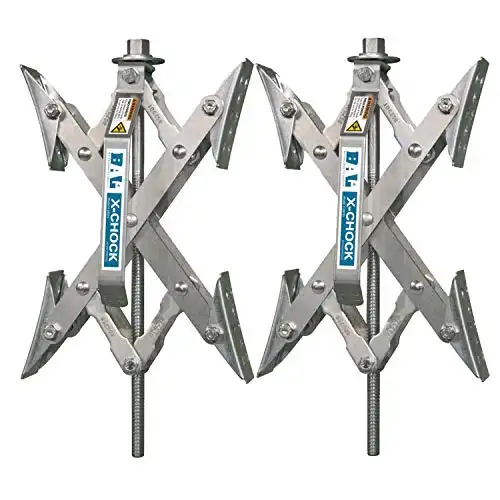
X-Chocks for wheels:
One of my favorite tools to help stabilize my travel trailer is to use X-chocks. These have become increasingly popular over the past several years. While you shouldn’t rely on these as an alternative to traditional and inexpensive wedge-type wheel chocks, they can provide a night-and-day experience for stabilizing your RV.
The X-style checks are designed to be used on a two-axel setup. They fit between the wheel on each side of the travel trailer and expand by turning a nut until they sit snugly against each tire. In essence, these wheel stabilizers will make each individual tire into a single stabilizing surface.
X-style chocks are quick and easy to install and will have noticeable results regarding trailer sway and rock. Many can be installed with a drill adapter, ensuring it won’t take a long time to get them installed. You can spend the extra time you have enjoying your camping trip.
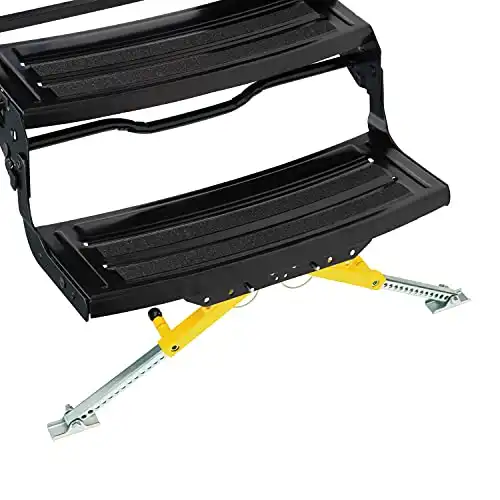
RV Step Stabilizer:
Often overlooked, a step stabilizer keeps your RV’s steps secure, preventing wobbling while entering or exiting the trailer. While this may seem more of a luxury than a necessity, a lot of trailer movement will occur when people come and go from the RV. If the steps are bouncy, the trailer will be as well.
Some RVs will have solid steps extending to the ground, creating a more traditional step. Others will have fold-out steps, which will hang in the air. If you have fold-out steps, you may benefit from step stabilizers, which are relatively inexpensive and easy to install.
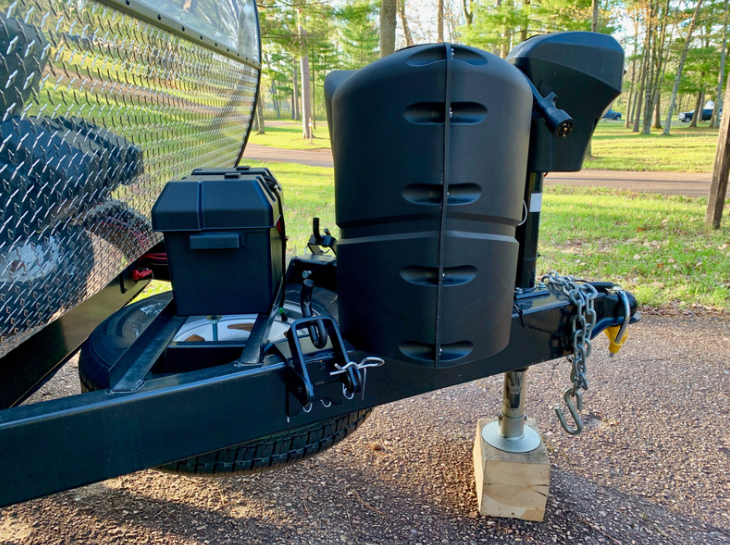
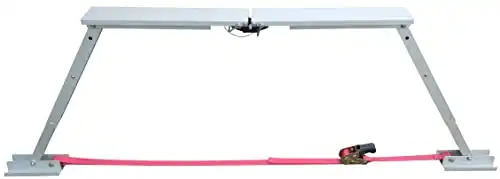
Frame/Bumper Stabilizer
One of the great things about the RV world is the innovations constantly designed to solve specific problems. One of these is stabilization. Beech Lane, a manufacturer of RV accessories, developed a rear bumper stabilizer.
The rear of the RV is typically a common source of bounciness. While the front has the tongue jack to help solidify the front of the RV, the rear is left hanging and can create a lot of movement inside the trailer. Stabilizing the bumper can significantly eliminate the bounciness many RVers try to avoid.
The device has two opposing angled legs, which are held taut by a ratchet strap. The setup creates a solid base to absorb any movement in the trailer. The stabilizer can be installed on the frame of your RV (sides) or the bumper. Multiple units can be used simultaneously to reduce wobble wherever needed. This is a great product to have on hand whenever you have a bounty RV.
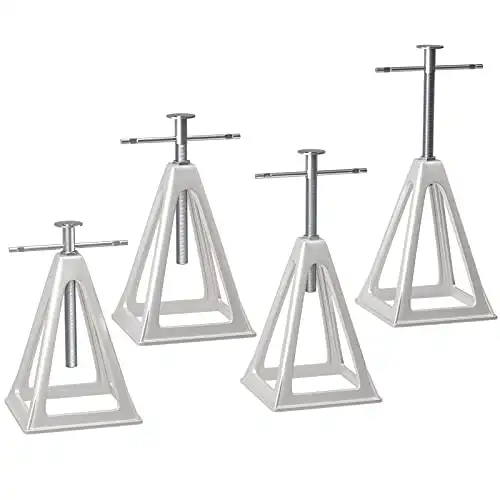
Moveable Jack Stands
Another tool some RVers choose to eliminate travel trailer movement is portable jack stands. Like your RV stabilizing jacks, these manual stabilizer jacks extend to provide a solid base between your trailer frame and the ground.
These heavy duty jacks are adjustable, meaning they can be placed in almost any part of the RV experiencing movement. They’re relatively inexpensive, and a set of 4 can significantly help you dial in the perfectly stable RV.
Slide Stabilizers
In a traveler trailer with slide-outs, you will see several products on the market that attempt to stabilize the slide section extending out from the RV. However, most manufacturers don’t recommend using them as they can cause problems with your slide-out mechanism. As the stabilizers are extended, they can move the slide out of square and actually cause your slide-out from getting off the tracks. While you may see some RVers using them, I suggest you invest your money elsewhere.
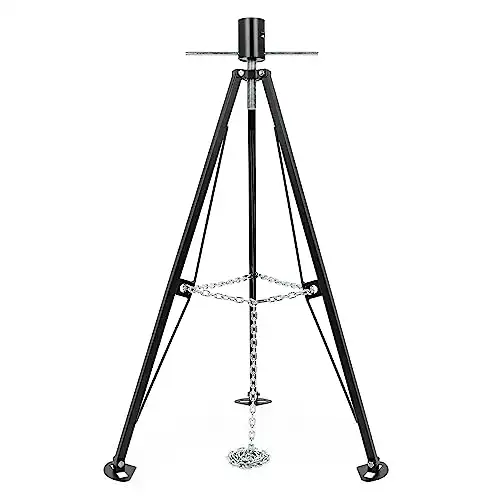
5th Wheels Stabilizer:
Although this article is about travel trailers, most RV owners will benefit from the same tips. One additional item to point out for 5th wheel trailer owners is the tripod stabilizer. This device is attached to the fifth wheel’s neck, which connects to the hitch in the tow vehicle when towing. The tripod provides a solid connection, much like a tongue jack on travel trailers, to prevent movement in the front of the RV. If you have a fifth wheel, I highly suggest you use this type of stabilizer if you’re experiencing bounciness in the front of the RV.
Considerations for Permanent Installation:
If you are a full-time RV life enthusiast or an original owner planning to stay at a permanent site, installing a more permanent stabilizing solution may be a good idea to consider. Some RV owners opt for stabilizing systems that become a part of the RV’s frame, providing consistent support for extended periods.
The Right Tools for the Job:
Having the right tools can make a noticeable difference in the efficiency and effectiveness of stabilizing your travel trailer. Besides the stabilizers and other products mentioned earlier, consider using jack pads to protect the ground surface from damage when deploying your stabilizing equipment. Additionally, carrying a bubble level and different types of levels can help you ensure accurate leveling.
Finally, remember you don’t need all the products mentioned to stabilize your RV. I suggest starting with one or two options and seeing if you get the required amount of stability from them. While additional products won’t hurt, you don’t want to spend hours setting up your RV if you don’t need to. Some RVers are happy not to use any special stabilizing equipment.
DIY Stabilizing Solutions:
For budget-conscious RV owners or those who prefer a hands-on approach, DIY stabilizing solutions can be an easy way to improve the stability of your travel trailer. Using lumber scraps or solid concrete blocks under the RV stabilizer jacks can be a cost-effective way to achieve stability on uneven surfaces.
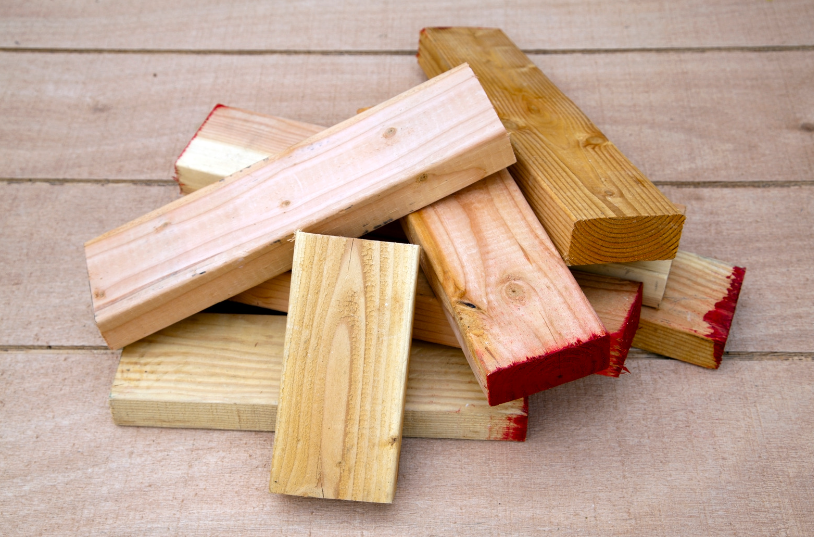
You can also use custom cut 2×4 lumber to wedge between the ground and your frame. However, you will likely want to carry various length pieces since your setup will differ between RV sites.
Tips and Tricks for First-Time RVers:
Stabilizing your travel trailer might seem daunting for new campers or those embarking on an RV trip for the first time. However, it can be an easy and smooth process with the right knowledge and preparation. Watching YouTube videos on proper stabilization techniques and seeking advice from experienced RV owners can provide valuable insights.
Also, you don’t need to go out and purchase everything before your first trip. Give camping a try without using any stabilizers, and then add some aftermarket options if necessary.
Additional Costs of Stabilizers:
While many stabilizing solutions come at an additional cost, investing in good quality equipment will pay off in the long run. Some links in this article may be affiliate links, meaning we may earn a commission if you purchase products through those links. These commissions help support the creation of valuable content like this guide.
Conclusion:
Stabilizing your travel trailer is an essential aspect of RVing that should never be overlooked. Utilizing the right tools, including stabilizers, jacks, chocks, and leveling systems, will make a noticeable difference in the stability and comfort of your travel trailer. Remember to choose good quality stabilizing equipment, especially considering the weight and type of your trailer. The good thing about taking the time to stabilize your RV is the final step: enjoying a bounce-free camping trip!

Nice for information
Telkom University