RV Batteries: What makes them special
Your RV battery is more than just a power supply when you’re off the grid. It is an integral piece of equipment that needs to be maintained and functional for your RV to function correctly. The RV battery is the main supply of 12-volt (12V) power to many of your RV appliances and devices.
Your RV battery is different than the one under your car’s hood. RVs utilize deep-cycle batteries designed for frequent deep discharges and recharging. Conversely, the battery that you use to start your engine provides a lot of power at one time. Due to their design, they’re not interchangeable.
Before we get into understanding and diagnosing RV battery problems, it’s essential to take a few moments and discuss how your RV electrical system works. Most RVs will utilize two different types of electricity: alternating current (AC) and direct current (DC). To keep it simple, AC is the type of electricity that comes from the grid. It’s what you use at home. Electronics that utilize AC are typically powered through a 120V plug. On the other hand, DC electricity is the type of electricity you use in your car, generated by the alternator and stored in the battery.
In an RV, these two types of electricity work together. This setup makes it very convenient when camping both on and off the grid. When you connect to shore power, your RV is receiving AC electricity. When you’re not connected, your appliances and electronics designed to run off DC will utilize the energy stored in the battery. Your battery gets charged by the AC using something called a converter. In some RVs, and with the correct battery setup, you may also be able to power some AC appliances. This task is possible with an inverter, which converts DC power to AC electricity. However, be aware- many RVs won’t come standard with an inverter.
For now, we’re just going to focus on DC power and your battery. As mentioned above, an RV battery will only run 12V appliances and electronics (unless you have it wired with an inverter). Some of the more common appliances that operate off your RV battery are low power items like your lights, slide mechanisms, awning, propane refrigerator, propane furnace, water pump, audio system, and igniter for your water heater.
Even those these are lower-demand appliances and electronics, they can still quickly deplete an RV battery if used heavily. Therefore, if you plan to run your RV disconnected from shore power for extended periods, you should consider upgrading your battery to a larger battery bank.
Tell me more about RV Batteries:
Common RV batteries types
The most popular type of deep-cycle battery that typically ships with an RV is lead-acid batteries. They’re available in three types: flooded wet cell, absorbed gas mat (AGM), and gel cell. The most common type in an RV is a flooded wet cell. The AGM is the next most popular, but most manufacturers don’t supply these as standard since they are more expensive. Finally, gel cell batteries are the least popular and not the best option for an RV because of slow charging limitations. However, putting differences aside, all lead-acid batteries function similarly. Each battery cell contains lead plates with a separator and an electrolyte solution (water and sulfuric acid). When a reverse current gets applied to the battery (through a battery charger or your RV converter), it creates electrons, stored in the battery, and made available when you need power.
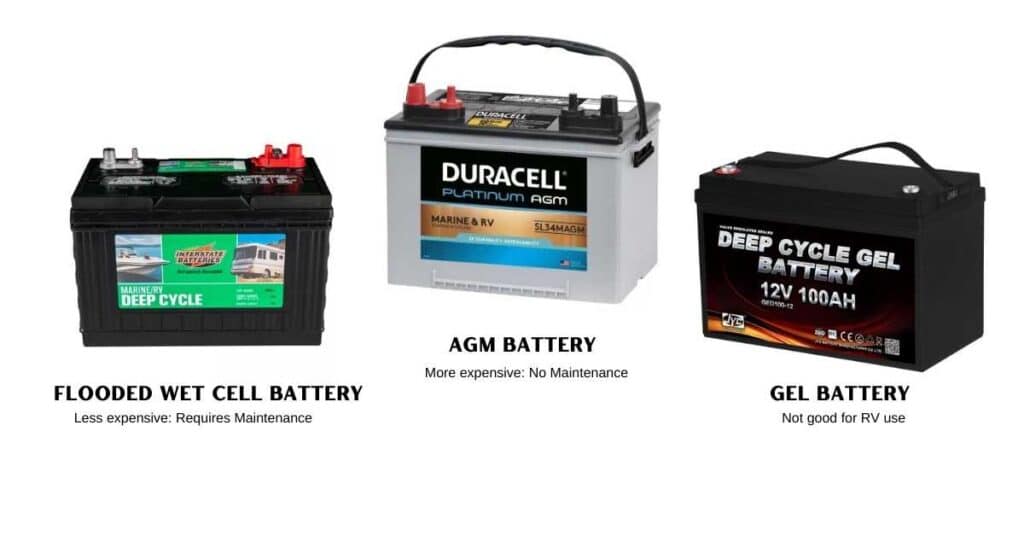
Flooded wet cell batteries will usually require maintenance, including adding the right amount of distilled water to the battery. AGM batteries are sealed and typically won’t require maintenance. Since every battery is a little different, you will need to refer to your battery’s documentation to determine if and how you need to maintain it. If you don’t have this, you can quickly look it up online at the manufacturer’s website. However, one thing to note about batteries is that if they’re not maintained, they will eventually fail, which may be the source of your RV battery woes.
While lead-acid batteries are still the most common type in RVs, more options are becoming available for other battery types, including lithium-ion batteries, the same kind of battery used to power most electric cars. If you are upgrading an RV battery or building a boondocking battery setup, you may want to think about these batteries. However, while
Battery Capacity and Amp-hours
Battery capacity refers to the amount of energy it can store, measured as amp-hours. Essentially, the more amp-hours a battery has, the more charge it can hold and more power it can deliver. Amp-hour ratings are available on the battery label. For example, most deep-cycle lead-acid batteries are calculated for a discharge time of 20 hours. The amp-hour rating will let you know how long your battery will last before it loses its charge.
It can get confusing, but let’s look at a simple example with some basic numbers. We’ll pretend that we have a 100 amp-hour lead-acid battery with a 20-hour rating in this scenario. To determine how long your battery will last, you need to do a little math. If you divide the 100-amp hour rating by 20 hours, you get five. That means that the battery can supply you with five amps of power over 20 hours before it loses its charge. If you use more, it will discharge faster. If you use less, then it will last longer.
To determine your power demand, you will need to determine how much electricity your devices need to run. Let’s look at one appliance as an example- an RV furnace. A typical RV furnace, using propane, will draw about 8-10 amps of power to run. Using the calculation above for a 100 amp-hour battery, we know we can get 20 hours of power for a 5-amp draw. However, the RV furnace uses 8-10 amps. Since you’re using almost twice the amp rating, you can expect about 10 hours of runtime in this scenario. You can repeat this step for all of the devices you plan to run to determine your capacity or decide to upgrade to a larger battery bank.
Also, if you’re trying to calculate how long your battery will last, you need to be aware of the discharge rate. The faster the battery’s discharge, the lower performance you’ll get. I like to think about this similarly to gas mileage. If your car has a rating of 25 mpg on the highway and you drive conservatively, you should get a result close to that estimate. However, if you’re driving aggressively, pushing the pedal to the metal, you’re going to get significantly worse performance. Batteries operate similarly, and it’s best to use them within their limits.
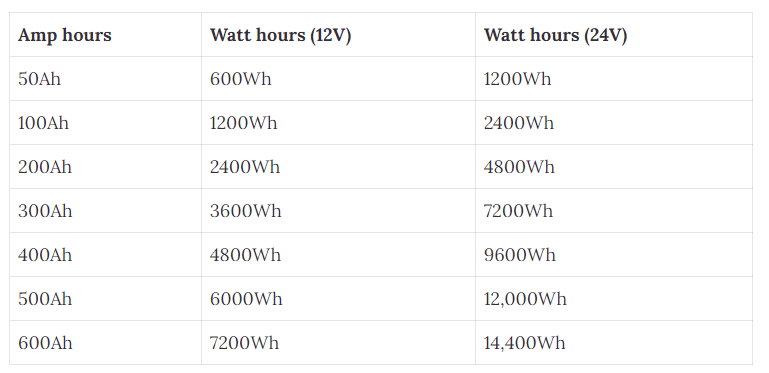
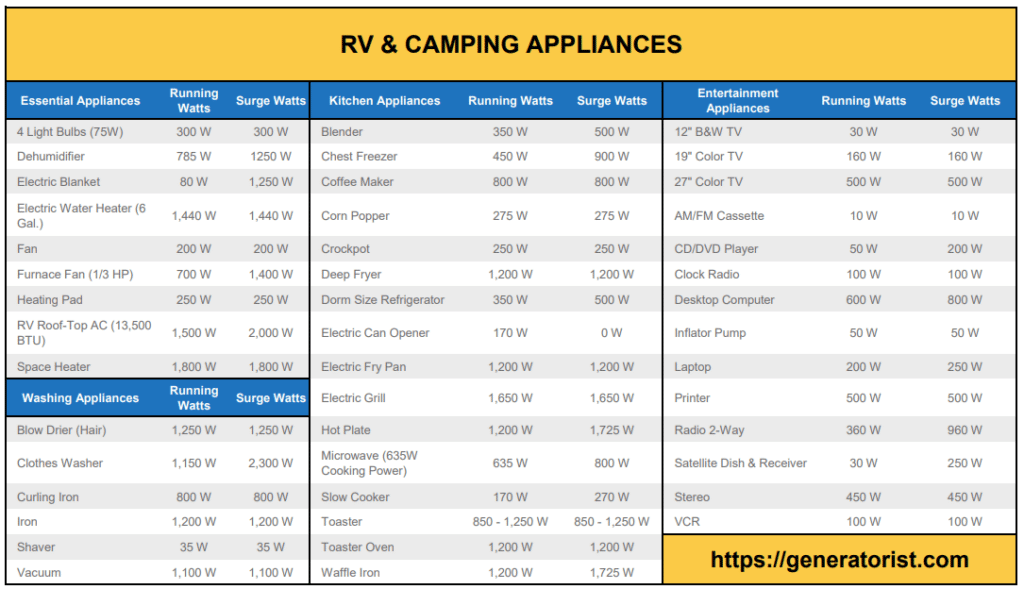
Calculating your battery draw is also possible by using watt-hours instead of amp hours. It works the same way. You can easily convert amp-hours to watt-hours by multiplying it by the voltage of the electricity supply. In an RV, when calculating for appliances that run off the battery, 12-volt, you’ll multiply the amp-hours by 12. So, for a 100 amp-hour battery, you have 1,200 watt-hours. Next, take 1,200 watt-hours and divide that by the 20-hour rating of the battery. You get 60 watt-hours per hour for 20 hours. Now, if you look at the chart below, you can get an idea of the running watts needed by various appliances. These are all 120 volt items, but you can get a sense of the various electrical needs of different appliances. Campers who convert to solar to power their 120-volt appliances rely on charts like this to size their systems.
If you need more power from a battery, you can always buy a larger battery. However, it is typically better to add an additional battery than switch to a larger one. By adding an extra battery, you’ll increase the amp hour rating and limit the drain you’re putting on a single battery. Also, if you add a battery, installing both batteries in parallel rather than in series is best, meaning that both batteries will supply power simultaneously.
Battery Maintenance
Proper battery maintenance is the number one preventative measure to ensure that your battery functions as it should. While batteries won’t last forever, they will last considerably longer than an improperly maintained battery if you take care of them.
The most critical factor that impacts battery life is how deeply you discharge the battery. In short, the deeper your discharge it or run it empty, the more damage you will do to your battery. You should never discharge a lead-acid battery more than 50%. Doing so risks irreversible damage.
The only reliable way to check your battery capacity is with a voltmeter (with a handheld unit or one that’s permanently installed in your RV). A fully charged 12-volt battery will read around 12.6 – 12.8 volts. When a battery reads below 12 volts, it’s below 50%. If you’re planning to rely on your battery for camping off the grid, you should invest in a voltmeter to check your battery. If you are always connected to shore power when camping, the best way to prevent over-draining your battery is to disconnect it when not in use. Also, when using your battery for RV power, avoid letting it drain all the way.
Another consideration in maintaining a healthy battery is making sure it recharges properly. When you drain down your battery, you should recharge it as soon as possible. Batteries should only be stored when fully charged. A drained battery will not last long if stored for extended periods.
Batteries also do not like extreme temperatures. So during cold winter months and the peak of the summer, it’s best to disconnect your RV battery and store it indoors in a stable climate. This concern is especially true if your battery is not fully charged or is left connected to RV power demands (even small parasite draws). While I don’t have data on this, I suspect that the springtime is the peak time for RV battery sales when RVers find out that their battery left on the RV didn’t survive the winter.
Common Questions, problems, and troubleshooting tips
Can I add another battery?
Yes, you can. However, If using more than one 12V battery, it is recommended that you use identical batteries that are the same size, model, capacity, and age. While there are differing opinions on this amongst RVers, for the best results and to power all of your 12-volt devices safely, you should try to match your batteries. This recommendation is especially true if you plan to rely on your battery system more heavily when boondocking or for more significant demand needs. If this is the case, you may also want to explore upgrading to several deep cell 6V batteries with higher Amp-hours.
My battery is dead or not supplying power.
One sure-fire way to tell that your 12-volt battery is not charging, or holding a charge, is that your dedicated 12-volt powered items will not work or are working poorly. If your battery has been working fine before experiencing a problem and suddenly stops charging, it may be time to do some battery maintenance or replace your battery. However, before doing this, make sure that you check your battery connections. Here are a few steps to follow when checking your connections.
Step 1: Check your battery disconnect switch
A flipped switch is a common problem that evades even the most seasoned RVers. Many RVs will have a battery disconnect switch, which cuts the power between the battery and the RV. You should read your owner’s manual to see if you have a switch and where it is. In many RVs, you can find the switch at the front of the RV, near the battery. Don’t forget to check the front cargo areas.
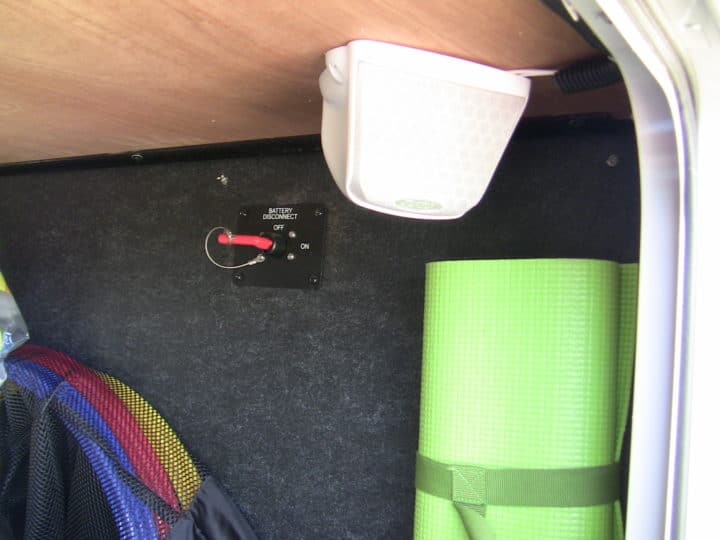
The purpose of this switch is to disconnect your battery from your RV appliances without physically disconnecting the wires. It’s like a light switch for your battery. Even when you turn all of your appliances off, there can still be small draws of electricity called a parasitic draw. While parasitic draws aren’t usually an issue during short periods, if you store your RV for a week or two, they can drain your battery. Turning the switch off will prevent this. If you don’t have a switch, you can also disconnect the battery from the RV when not in use.
If you don’t have any 12-volt power, the switch is the first thing to check. If you turned it off after your last trip, it’s easy to forget to flip it back on. Also, when loading or unloading supplies into the cargo area, it’s easy to bump the switch and disconnect your battery inadvertently.
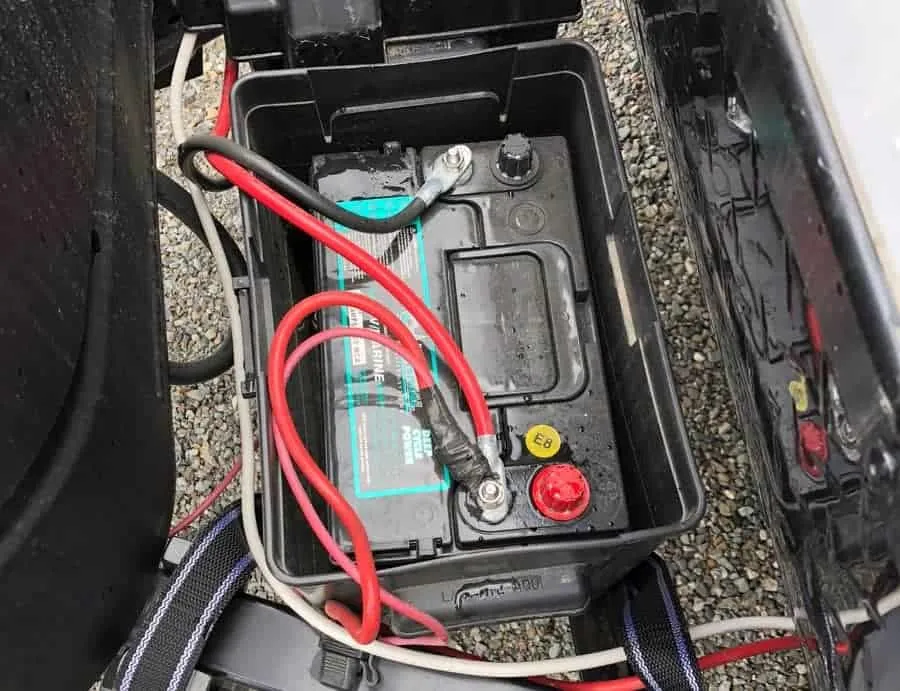
Step 2: Check your battery terminal connections
When traveling, the trailer can bump around, and if you don’t have tight terminal connections on the battery, a wire can become loose. Check each connection to the positive and negative terminal posts. Make sure that they’re tight and not corroded. A corroded battery connection will look like a white/greenish buildup on the terminals. Corroded terminals is the number one reason for a battery not working correctly (in both cars and RVs)
Corrosion is another term for sulfation. Sulfation occurs slowly over time as the battery charges and discharges. Tiny sulfate crystals can start to form on the terminals, and if they build up too much, it may prevent a proper connection between the battery and your RV. Luckily, fixing corrosion is easy.
Cleaning a corroded battery:
Start by disconnecting the battery by removing the cables from positive and negative terminals (disconnect each one separately and don’t touch both simultaneously). Next, you’ll want to neutralize the sulfuric acid before cleaning it off. Think back to high school chemistry- acid has a low pH, and you need a high pH base to neutralize it. Just grab some baking soda, mix it with water, and pour it over the terminals. Next, take a small, sturdy brush and scrub each battery post clean. Let the mixture sit for a few minutes, and then wipe the terminals clean. Make sure to wear gloves and avoid contact with your skin and clothing.
Once the terminals are clean, you can reconnect the wires to the battery. Also, to prevent corrosion in the future, it’s best to apply some battery terminal sealant spray or gel, which is easy to find at any auto parts store for a couple of dollars.
Now is also an excellent time to inspect the wiring leading from the battery into the RV. If a wire was rubbing against the frame, it could be shorting out your 12-volt power. A common problem is false ground. For example, a false ground could happen if the battery’s negative wire rubs against bare metal on the RV, which can occur if the protective sheathing gets damaged from traveling. While not very common, it does happen and can be challenging to diagnose.
Testing your battery
If all connections are tight and there aren’t any immediate signs of loose or damaged wires, it’s now time to test your battery. To do this, we’ll cover a simple voltage test. To conduct this test, you’ll need a multimeter. You don’t need a super expensive one, but make sure that it can read DC in addition to AC.
This test is straightforward. Place the multimeter’s leads on the positive and negative terminals of the battery. Make sure you set the multimeter to DC volts. If you’ve never used a multimeter before, it’s a good idea to watch a few youtube videos to get familiar with it. There are countless types of multimeters available online, but it’s a good idea to purchase one with good reviews from a reputable manufacturer. However, even the most inexpensive ones will work well enough for basic voltage testing in a pinch.
Based on the reading you get from your multimeter, you can determine the state of charge. A fully charged 12-volt battery will read around 12.6 – 12.8 volts, half that for a 6-volt battery. If your battery is showing a full charge, the problem isn’t the battery and may indicate a problem with the wiring, converter/inverter, or something else. If the battery is showing a low voltage, then it’s time to check the charge and if the battery can hold a charge.
When connected to shore power, your RV converter will charge your battery. The first thing you’ll want to do is plug your RV in and ensure that your battery connections are secure and clean. Then, let your battery charge for a few hours. Batteries charge slowly, which is vital for battery health. In a few hours, you should notice, by testing the voltage, that your battery has charged. The problem may be with the converter or a loose wire if it doesn’t. In that case, repeat the charging process with an external charger.
After you confirm that your battery is charging, note the current volt reading. Then, disconnect the battery and let it sit for a few hours. Your battery, disconnected from the RV, should hold that same charge during that time. If it doesn’t, you’ve confirmed that your battery is the problem and not holding a charge. You will either have to replace the battery with a new one or reconditioner your battery. On the other hand, if it maintains the charge, your problem may be elsewhere, and you will need to troubleshoot further.
Troubleshooting your converter
Another less common reason your battery won’t charge may signal a problem with your converter. Most converter problems are associated with the cooling fan or thermal sensor. The converter fan is needed to keep the internal components cool, and if it fails, the converter may overheat, causing a short in your battery charging system.
Diagnosing a failing converter may be difficult if the problem is not constant. To start, give it a visual inspection, carefully inspect for signs of burned wires, see if you can notice any burning smells or anything else that looks off, such as dark areas from it overheating.
If you notice any of the above, it may be time to replace it. If the fan isn’t running, you can use your multimeter to make it’s getting power. If the fan isn’t getting sufficient power, you may need to replace the converter fan, which is less expensive than replacing the entire converter.
If your fan is receiving power, but there is still excess heat or a burning smell, you may have a faulty thermal sensor. You can also check the thermal sensor with a multimeter and replace the part from the manufacturer. If you need to replace the thermal sensor, you should call a professional to assist you. It can be a little tricky. However, whenever calling a professional, factor in the cost of service vs. purchasing a new unit. A new converter may be much less expensive than hiring someone to replace or repair part of it.
Check your Circuit Board
If everything else looks good and you are still not getting power from your battery, one other component to check is your RV circuit board. When connected to shore power, and if you experience a power surge, it can trip one of your breakers or DC fuses. A tripped breaker will look the same as one that trips in your home. The breaker switch will be partially flipped over. Resetting it is the same as well. All you need to do is flip it back into the on position. If it keeps tripping, you likely have a problem with the equipment or outlet it’s powering.
When you have a 12-volt fuse trip, this will be similar to a blown fuse in your car. Rather than a switch, most RVs will have a plug-in fuse that you will need to pull and replace. Some RV circuit board panels will have a light indicator, when lit, will let you know that you have a bad fuse. You want to remove and replace that fuse with the correct size. It’s a good idea to keep an assortment of fuses on hand if you need to replace one.
Suppose you suspect an issue with the circuit panel rather than an individual fuse or circuit. Then, you can try to diagnose the problem through the process of elimination. To do this, first, remove each fuse or switch off each circuit breaker. Next, you’ll begin checking each one individually. Next, turn on the appliance listed for each circuit and switch the breaker on or reinstall the fuse. Finally, make sure that it functions correctly. If you run into an issue where something is not getting power, even though the circuit board indicated that everything is fine, you may have a faulty circuit board or a problem with the appliance. This situation isn’t very common as most issues are associated with a blown fuse or tripped breaker. However, if you suspect it is a problem with the circuit board, you should enlist the services of a licensed electrician to repair or replace it.
Conclusion
RV batteries are a great way to help power your camping trips. However, they can have problems, but with proper maintenance and a little know-how, you can solve most of them. The most important thing to remember with batteries is that if you take care of them, don’t over-discharge, and keep them out of extreme elements, they’ll last you a long time. Battery technology will only improve in the future, so 10 years from now, you may be relying on them much more while camping. Please feel free to leave any tips, ideas, or questions in the comment box below.